How to Update the Arduino WiFi Shield Firmware
Fri 21 March 2014
The firmware that ships with the Arduino WiFi shield (v. 1.0.0) doesn't work properly. Fortunately, they've written new firmware (v. 1.1.0). Unfortunately, updating it is a bit tricky. I found both the official Arduino instructions and the instructions at Flashgamer.com helpful (particularly the latter), but neither of them worked perfectly for me, and after I completed them I had trouble telling if the firmware was updated or not.
I've had to complete this process several times now. Here's what is consistently working for me.
1st: Get the Firmware
From your Arduino IDE
If you have the Arduino IDE v. 1.0.5, the new firmware should be inside - you can skip the rest of this section.
(I'm not sure about other IDE versions). On my Mac, the IDE
is at /Applications/Arduino.app and the WiFi firmware is at /Applications/Arduino.app/Contents/Resources/Java/hardware/arduino/firmwares/wifishield.
You can double-check that you have the right version by going to lines 41-42 of
wifishield/wifiHD/src/main.c. They should say this:
/* FIRMWARE version */
const char* fwVersion = "1.1.0";
From Github
The code is also on Github if you need it. There are two versions on Arduino’s Github account:
- https://github.com/arduino/wifishield (firmware last updated 2013-01-19)
- https://github.com/arduino/Arduino/tree/master/hardware/arduino/firmwares/wifishield (firmware last upgraded 2013-03-28)
The second repository is the one you want. The first one contains the old firmware.
Cloning the second repo is a pain because you have
to download the full Arduino IDE, not just the WiFi shield firmware,
and the repository is over 250 MB. I found it easier to just download the
individual files, which are located in the wifishield folder linked to above.
Where should I put it?
The official instructions are not clear about where to keep the new firmware. Putting them in an arbitrary folder caused me a lot of problems later on. I recommend keeping the new version where the old version used to be. Back up the old firmware with version control or by copying it to a different directory outside of Arduino.app.
2nd: DFU Programmer
DFU Programmer is the software that gets your new firmware on your Arduino (DFU stands for 'Device Firmware Update'). I was able to download it using the official Arduino instructions, but you can also get DFU Programmer directly from its project homepage.
3rd: Set the Jumper
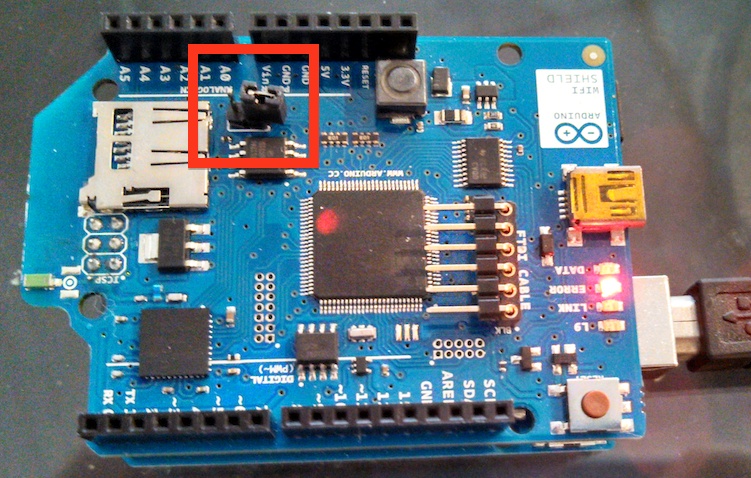
You need to set the jumper to put the WiFi shield in programmable mode. The jumper is a a tall, rectangular piece on your WiFi shield, located near the power and ground pins.

The jumper is held up by two pins. Actually, right now it should only sit on one of the pins (as shown in the picture above). To set it, pull it off and replace it so that it sits over both pins. This puts the shield in programmable mode, allowing you to update the firmware. After the update, you'll need to unset it before you use your Arduino again.
4th: Fix the Path in the Install Script
If you're on Linux
or Mac, you can transfer the new firmware to the Arduino with one of the install scripts
in wifishield/firmware/scripts/
(ArduinoWifiShield_upgrade.sh for Linux, ArduinoWifiShield_upgrade.sh for Mac).
Before you run them, you'll have to fix a small error in the path
where it looks for the firmware. Change:
WIFI_FW_PATH="/hardware/arduino/firmwares/wifi-shield"
to:
WIFI_FW_PATH="/hardware/arduino/firmwares/wifishield"
5th: Upload the Firmware
It's go time! Link your WiFi shield to your computer using a mini USB cable (don't leave the shield connected to the Arduino). Then run:
cd wifishield/firmware/scripts
sudo sh ArduinoWifiShield_upgrade_mac.sh -a /Applications/Arduino.app/Contents/Resources/Java -f shield
You should see output like this:
       Arduino WiFi Shield upgrade
=========================================
Disclaimer: to access to the USB devices correctly, the dfu-programmer
needs to be used as root. Run this script as root.

****Upgrade WiFi Shield firmware****

Validating...
257254 bytes used (101.30%)

Done. Remove the J3 jumper and press the RESET button on the shield.
Thank you!
6th: Check that the install was successful
To verify that your WiFi shield is using the new firmware, mount the WiFi shield on your Arduino and upload this sketch:
#include <WiFi.h>

void setup() {
  Serial.begin(9600);
  Serial.println("the version is: ");
  Serial.println(WiFi.firmwareVersion());
}

void loop() {
}
Check the serial output (in the IDE, you can do this by clicking on the magnifying glass at the upper right corner of the sketch). It should say:
the version is:
1.1.0